Authentication & Authorization
Secure your APIs with JWT authentication and RBAC authorization.
Where to configure routes: default login requirement, public routes, and RequirePermission are documented with examples in Middleware (start with default API authentication, public routes, and permission checks). This page focuses on identity flows, RBAC concepts, and integrations (OAuth, LDAP, MFA).
Authentication (Who are you?)
JWT Token Flow
1. User submits credentials → 2. Server validates → 3. Server returns JWT token
   ↓
4. Client stores token → 5. Client sends token in requests → 6. Server validates token
API routes: default login, public routes, and permissions
On the standard API router group, WithAuthentication is applied by default—handlers normally assume a logged-in user. For no-login endpoints, use middleware.WithoutAuthentication(router.Group(...)). For fine-grained access, attach middleware.RequirePermission("resource:action") (and related helpers) on specific routes or groups. See Middleware for copy-paste patterns.
Getting Current User
func (c *UserController) GetProfile(ctx *gin.Context) {
    // Get user ID from context (set by the authentication middleware)
    userID, exists := ctx.Get("user_id")
    if !exists {
        util.RespondWithError(ctx, util.NewErrorMessage("E4012", "Unauthorized"))
        return
    }

    // Get user from database
    user, err := c.svc.User().GetByID(ctx.Request.Context(), userID.(string))
    // ...
}
Authorization (What can you do?)
RBAC Structure
User → Roles → Permission Groups → Permissions
Permission Naming
Use format: resource:action
Examples:
users:read- View usersusers:write- Create/update usersusers:delete- Delete usersadmin:all- All permissions
Protecting with Permissions
Under the default API group, routes are already authenticated; add permission middleware only where you need authorization beyond “any logged-in user”:
// Single permission
router.POST("/users",
    middleware.RequirePermission("users:create"),
    controller.CreateUser,
)

// Multiple permissions (OR logic)
router.DELETE("/users/:id",
    middleware.RequireAnyPermission("users:delete", "admin:all"),
    controller.DeleteUser,
)

// Multiple permissions (AND logic)
router.PUT("/users/:id/role",
    middleware.RequireAllPermissions("users:write", "roles:assign"),
    controller.AssignRole,
)
More examples (mixed “login only” vs permission-gated routes): Middleware: permission checks.
Check Permission in Code
func (c *UserController) UpdateUser(ctx *gin.Context) {
    userID := ctx.Param("id")
    currentUserID := ctx.GetString("user_id")

    // Check if user is updating their own profile or has admin permission
    if userID != currentUserID {
        hasPermission := c.svc.User().HasPermission(currentUserID, "users:write")
        if !hasPermission {
            util.RespondWithError(ctx, util.NewErrorMessage("E4031", "Permission denied"))
            return
        }
    }

    // Continue with update...
}
OAuth2/OIDC Integration
EZ-Console supports OAuth2/OIDC providers (Google, Okta, Azure AD, generic OpenID Connect with discovery, etc.).
Where OAuth is configured
You can define OAuth in two places (they can be used together; see OAuth & LDAP Integration for how that interacts with the login UI):
- Configuration file —
config.yml(or equivalent deployment config) under anoauthsection for static, Git-managed provider definitions. - Admin console — System → Settings → OAuth2.0 Authentication for operators who prefer UI-driven setup (including Auto Discover / well-known endpoint based providers, client credentials, scopes, redirect URI display, auto-create user, default role, and role mapping).
For step-by-step UI fields and screenshots, see OAuth & LDAP Integration: OAuth2/OIDC.
Example (config.yml)
oauth:
  enabled: true
  providers:
    - name: google
      display_name: Google
      client_id: your-client-id
      client_secret: your-client-secret
      auth_url: "https://accounts.google.com/o/oauth2/v2/auth"
      token_url: "https://oauth2.googleapis.com/token"
      user_info_url: "https://www.googleapis.com/oauth2/v2/userinfo"
      redirect_url: "http://localhost:8080/api/auth/callback/google"
OAuth Flow
1. User clicks "Login with Google"
   ↓
2. Redirect to Google login
   ↓
3. User authorizes
   ↓
4. Google redirects back with code
   ↓
5. Exchange code for token
   ↓
6. Fetch user info
   ↓
7. Create/update user in database
   ↓
8. Return JWT token
LDAP/Active Directory
LDAP (including typical Active Directory–compatible directories) is configured only in the admin backend, not via the static config.yml OAuth-style block.
Use System → Settings → LDAP Authentication: server URL, bind DN and password, base DN, optional user filter, attribute mapping (user / email / display name), default role, and timeout. There is no separate “LDAP section in config.yml” for operators; use the console (or the system settings API your deployment exposes) so credentials and connection details stay in the managed settings store.
Screenshots and field-by-field guidance: OAuth & LDAP Integration: LDAP.
Multi-Factor Authentication (MFA)
End users enable MFA from the Profile Center → Two-Factor Authentication tab. They can choose TOTP (authenticator app) or E-mail (when email MFA is enabled for the deployment). For TOTP, the flow is a short wizard: prepare → scan QR code (or copy the secret key into the app) → enter a 6-digit code and verify to complete enrollment.
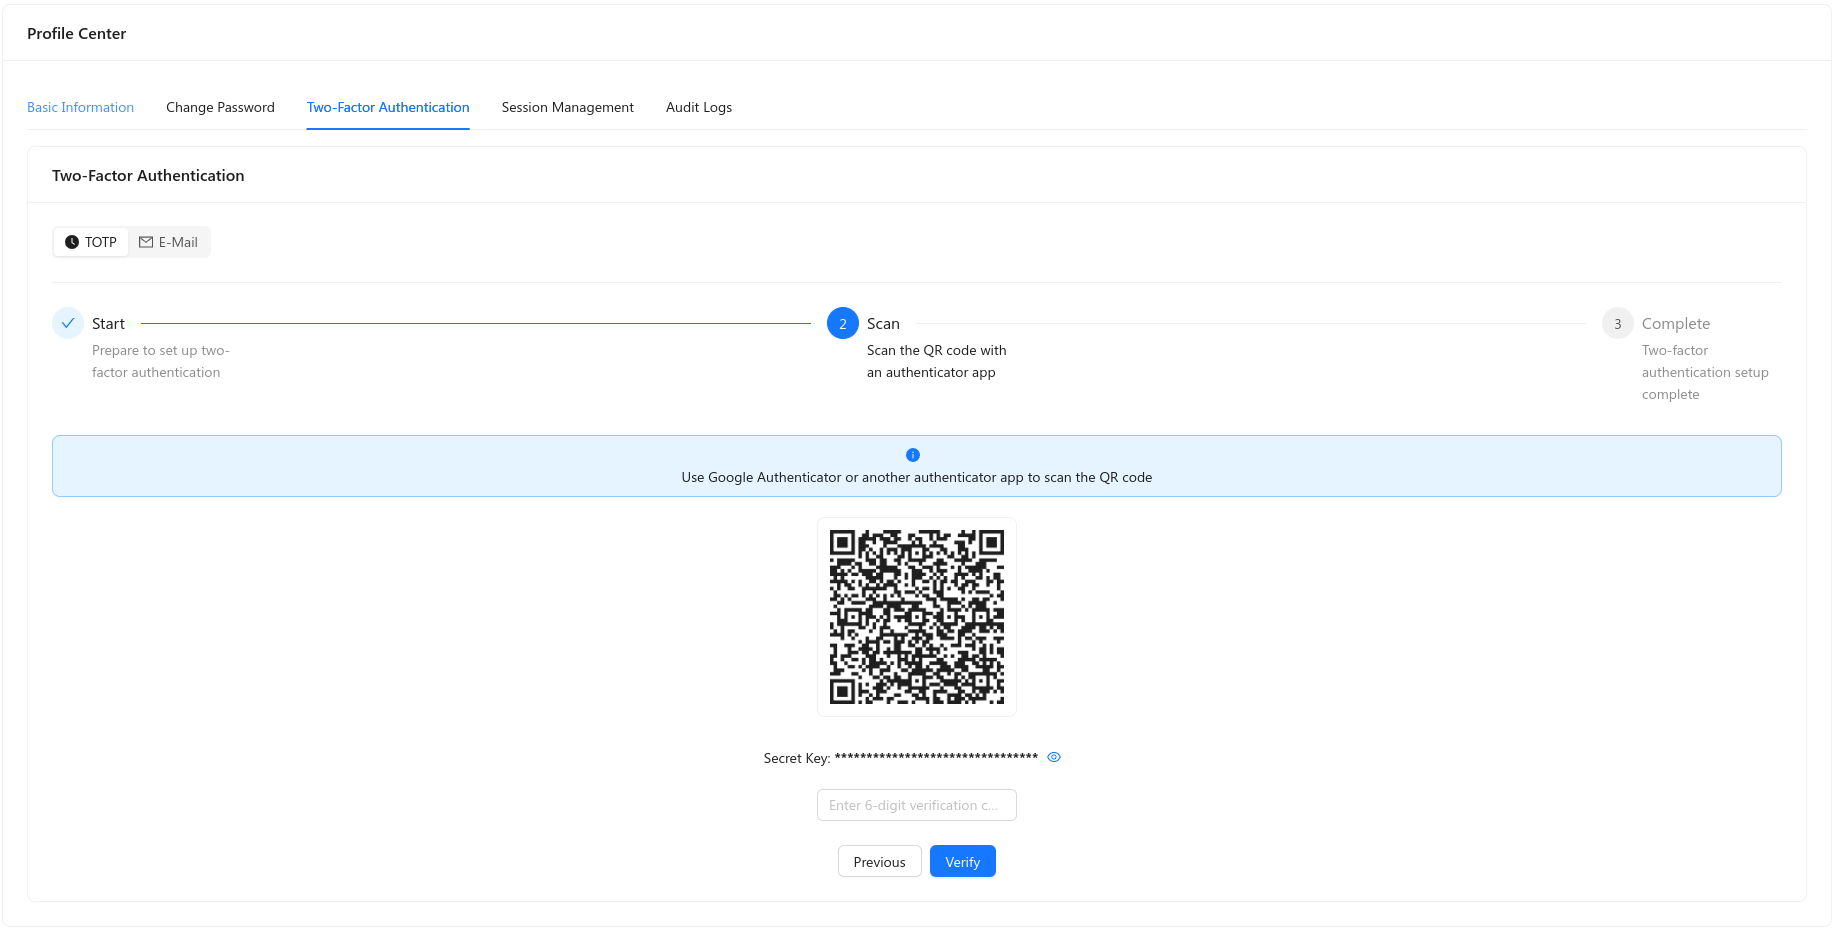
System-wide policies (for example enforcement, issuer name, email MFA) are configured under System → Settings and Security settings.
Best Practices
DO ✅
- Always use HTTPS in production
- Store passwords with strong hashing (bcrypt)
- Implement rate limiting on auth endpoints
- Use refresh tokens for long-lived sessions
- Implement account lockout after failed attempts
- Log all authentication events
- Enforce strong password policies
DON'T ❌
- Don't store passwords in plain text
- Don't put sensitive data in JWT claims
- Don't use predictable session IDs
- Don't ignore failed login attempts
- Don't skip permission checks
- Don't trust client-side authorization
Next Steps
- Apply auth on routes: Middleware (canonical route patterns)
- Implement audit logging
- Review API best practices
- See also: Creating controllers, Core concepts, FAQ